OK so when I first wanted to learn this stitch I had a HECK of a time finding something I could follow with easy and it was through trial and error that I finally figured it out myself.
Now there are a few different kinds of hooks you can use.
There is the Fixed Afghan Hook which is solid like a knitting needle.
 |
| Fixed Afghan Hook It's a little awkward to hold I have to admit |
There is the Flexible Afghan Hook, like a regular crochet hook only this one is equipped with a long flexible (usually some type of plastic) tail.
 |
| Flexible Afghan Hook This is my personal favorite as I have found a way to wrap it around my wrist to make it more comfortable |
Lastly there is the Double Ended Crochet Hook or Cro-Hook for short, essentially it looks like a pair of circular knitting needles only the ends are hooks not points.


 |
| Double Ended Crochet Hook or Cro-Hook As intimidating as these might look if you can use either of the above then this one is no trouble at all. |
Basic Tunisian/Afghan Stitch
Abbreviations used
YO = Yarn Over
Chain stitch how many your pattern calls for or how ever many you want to do.
 |
| For this example I chained 10 since I am using a regular 'I' hook |
Skipping the first chain on the hook insert your hook through the next chain (second from the hook)
 |
| I always use the bottom of the chain, it seems to keep everything neat. |
YO, pull through, leave the loop on the hook

There should now be two loops on the hook

Repeat the previous to the last chain
 |
| Once again since I'm using a normal crochet hook for this I can only do so many, this is where the specialty hooks come in handy. |
Now this part is both easy and tricky
(If you happen to crochet tightly or are just clumsy like me)
(If you happen to crochet tightly or are just clumsy like me)
YO pull through one loop

YO pull though two loops

Repeat previous until end
 |
| From my experience no matter the number of stitches (odd or even) it always ends out even at the end of the row. |
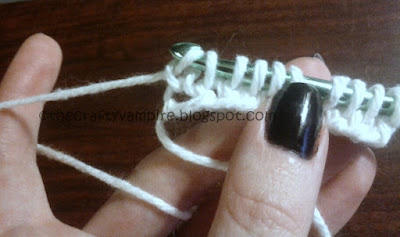
To continue the stitch for how ever long your piece is going to be, insert hook in second little bar from the hook, yarn over pull through
 |
| This one here, NEVER the first one at the end, the loop on the hook always counts as your first |
 |
| Insert hook YO |
Pull through repeat
 |
| Once you get the hang of it it goes quick |
Repeat until end

Then again you will YO pull through one
*YO pull though two
repeat from * until end

Finishing Up/Fastening Off
Similar to the previous rows insert hook in second bar from first loop

YO
Pull through

Unlike the previous rows you will pull that new loop through the previous loop

 |
| Essentially it is like a single crochet without the second YO |
So you make a new loop and pull the new through the old all the way to the end


So you continue this until your all the way at the end and...
 |
| TADA! All done |
 |
| And this is what the back looks like, similar to a stockinette stitch |
I really hope this guide wasn't too confusing it's my first how to, so be sure to leave me some feed back.

Fantastic guide!! Thank you!
ReplyDelete